Wooden Cnc Router Drawer Slides Plans
Dovetail Drawers on a CNC Router
A wide-ranging discussion about cut dovetail drawer joints on a CNC. Nov eight, 2008
Question
Are any of you cutting out hardwood dovetail drawers on a flatbed CNC? If so, what are you lot using for a program? I know that Due east-Cabinets has a system, just I've just seen them cutting out plywood drawers at their demos. If any of you are doing this successfully, what are your time savings over doing dovetails with a hand router and dovetail jig? I know it'south faster to lodge them, but if a CNC could exercise it efficiently, I might requite information technology a try.
Forum Responses
(CNC Forum)
From contributor K:
We have a Thermwood router and use eCabinets to cut dovetails. We use 5/eight Baltic birch plywood as our standard dovetailed drawer box. Nosotros take also cutting dovetails using oak or maple. It is a slower process considering you have to stand there and keep changing your pieces of forest, but information technology does work.
From correspondent South:
No flatbed CNC with E-Cabinets tin can cutting dovetail. The final product is a fake, a dovetail look-alike. It is only a simple fat joint with no belongings ability. Don't write "dovetail" on your proposal.
From contributor A:
I call back Router Cad has a dovetail drawer box option y'all can add on.
From contributor C:
Take a look at the Vortex system. I bought ane about a calendar month ago, but have not had a chance to use it withal. Comes with a .dxf to aid programming.
From correspondent J:
I but ran my start set of solid maple dovetail drawers using our Homag CNC. I used 2 standard 1/2" dovetail router bits. One was used for the standard vertical routing on the fronts and backs. The other bit was placed in my aggregate and did the horizontal routing on the side pieces. Worked great! Not blazing fast, but much better than using a hand router and jig.
From contributor I:
For united states 3axis guys, I am curious near the Vortex. Let united states know when you run information technology and how strong and attractive it is.
From correspondent Z:
I am actually impressed by this Vortex organization. This is the offset I have seen of information technology. Anybody else really using it? I'k curious how information technology reacts to plywood and solid in the real world.
From contributor R:
Contributor J, could you lot tell me more about how you laid this out? I would like to try and exercise some dovetails on my Busellato!
From contributor J:
I set information technology up where I have a parametric program that I can specify if it is a front/back or a side. If it is a side, the aggregate is used for the horizontal routing. If it is a front/back, vertical routing is performed. I�ve set it upwards where it only does 1 side of the lath at a fourth dimension then I don�t have to keep changing pods. I do have it programmed where I could exercise both sides if I have a job with a lot of the same size pieces. Our tabular array has ii zones, so I tin identify a program on each zone and run it in shuttle way, which speeds up the process. Overall, I go good quality parts and it�s a lot easier and faster than the erstwhile router and jig process.
From contributor Yard:
I have cut thousands out of 5/8 Baltic birch. They're neat - non had a doctor or lawyer or factory worker offer to pay me the extra $35 per drawer I charge for solid maple that used to exist my standard. I do have one cut customer who still likes to utilize solid maple. He lays upward 37" broad or less blanks out of soft maple, brings them to our shop and we run them through the broad belt to .625 and so nosotros put them on the router and nest them just like plywood. Yous have to boring down the cutting a flake and use precipitous tools, but they're bang-up. The router might take upward to an hour to run a sheet 37" 10 120" depending on the drawer sizes. I remember the last fourth dimension we tracked information technology, nosotros were cutting for ii kitchens. It took three laid upwards blanks and cutting fourth dimension was about 3 minutes per drawer over a lot of something like 50 drawers total.
From contributor U:
Correspondent J, as I'm sure you know, when doing dovetails conventionally, the front/back piece acts equally a fleck breaker for the sides. When using the aggregate to mill the sides of the drawer, practise you feel any blowout when the scrap passes through?
Contributor M, I've contemplated trying to nest the dovetails using a glued upwardly blank of solid maple, but I always causeless that it wouldn't lie dead flat on the table and there would be Z axis issues. Hearing that you've had success makes me want to give it a try.
Accept whatever of you nesters ever tired to follow up the 1/four" straight scrap with an ane/8" diameter bit? I think information technology would exist a lot more pleasing to the eye.
From contributor M:
Keep in mind that we pull those laid up panels right out of the wide belt and run them within a hr or so. I definitely would not want to let them set effectually overnight. I as well use a .040 skin. Besides a i/4 upcut screw flake is the but thing I found to cut in and out of the tails in solid wood that would non break. We use pinch for Baltic birch, only for some reason I bankrupt compression bits 1 subsequently the other until I switched to the upcut.
From contributor C:
For those interested, I ran a quick dovetail prepare this morning using my new Vortex bit. Here are a couple of pictures, and I videoed information technology as well, so I'll try and get that up so you tin can come across it in action. I'thousand pretty happy with how it came out. It needs a little scrap of tweaking. I call back it's virtually .01" too sloppy a fit, simply for a offset shot, bully. I as well ran a ane/4" slow helix up-shear instead of a pinch since I ran information technology in solid maple instead of ply. As well, I didn't spend a huge amount of time prepping the stock. It's not cut perfectly square and such, then it'due south non perfect, simply I think you can see it can exist once you get it figured out.
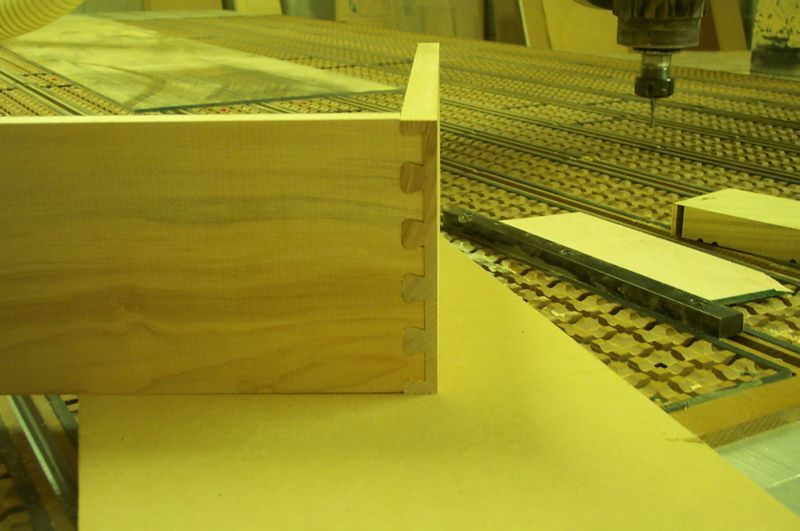
Click here for college quality, total size image
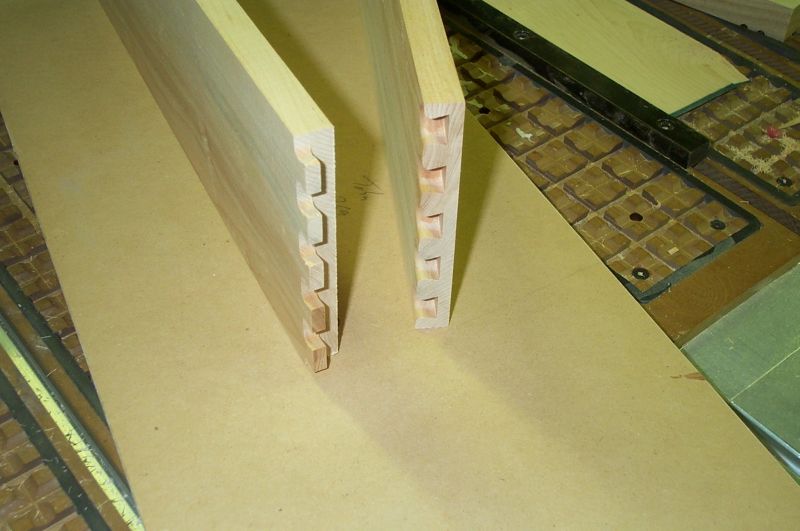
Click here for higher quality, full size epitome
From correspondent S:
The joint on your photo is a bird tail joint, non a dovetail articulation.
From contributor I:
Contributor C, thanks, and I will at present purchase the arrangement! It might non work, only this is why I watch and participate with WOODWEB.
From contributor C:
Actually, it's called a half-blind dovetail (see Wikipedia).
It will work keen for half-blinds, or more importantly, my needs. For the money, it'south tough to beat.
From correspondent F:
Here is proficient advice for masochists: do what I did. I made a jig that vaguely resembles the layout of the cheap hand jigs you buy for $50 at Rockler except that it will hold xvi pieces at a time (assuming 6" drawer sides). I too didn't stack the pieces on peak of each other, rather split up of each other. I and then wrote a spreadsheet program where I tin can input all of the parameters that I want including actual diameter of the cutter chip, adjustments for the differences betwixt the cups and pins (for fit), etc.
It is really time consuming (times ten), but what I take created is a organization that is flexible, can cut whatever width of dovetail with the change of one number on whatsoever width or thickness of drawer side (only express by the length of your x axis), tin can do bullheaded or full dovetails or finger joint or ?, and even can trim my fingernails while information technology is at it. I programmed it to cut in from both sides for the pins to eliminate blowout so it works with any material. The only take hold of is that you have to hang half of the pieces vertically off the end of the tabular array (clamped in the jig of course). This limits the length of the drawer side to the height of your tabular array off the ground. I take cut them in depression grade plywood and even 1/2" melamine equally an experiment with actually adept results. Once yous ready it up the kid in the store can run it. They merely take to keep the sides and faces oriented correctly. A petty pencil mark on the pieces or a piece of tape commonly works.
From contributor A:
How about some pictures of this setup?
From correspondent F:
Deplorable, I am in the process of rebuilding my table so I had to tear downwards the jig. However I use some quick clamps (over middle clamps, I call back they are chosen) to agree the pieces both vertically with one wide side of the lath pointing toward Y and the end pointing straight up so the other boards laying flat on the table with the ends sticking off a scrap. Ready some stops and anyone can load the rack, so to speak.
From contributor C:
Finally posted the video...
Source: https://www.woodweb.com/knowledge_base/Dovetail_Drawers_on_a_CNC_Router.html
0 Response to "Wooden Cnc Router Drawer Slides Plans"
Post a Comment